VMWare UMDS (VMware Update Manager Download Services) is feature and extra add on software included in VCSA ISO file, It helps downloading update metadata, patches, security fixes and latest drivers binaries from online VMware/Vendor hostupdate Repositories. It helps in way to make your VMware Update infrastructure secure, UMDS can put behind firewall, the application need to open to outer world on internet, UMDS Server acts as centralized local update repository, where vCenter update manager (Update Planner/Lifecyle Manager), It will download all the updates and they don't require direct internet access. As below diagram I have 2 VMware update manager server (Update Planner/Lifecycle Manager) and they don’t have direct access to internet, They will use UMDS server configured with nginx server on linux server, to get the update, UMDS is put behind firewall connected to internet and Update managers/Lifecyle Manager uses Nginx web urls to download update.
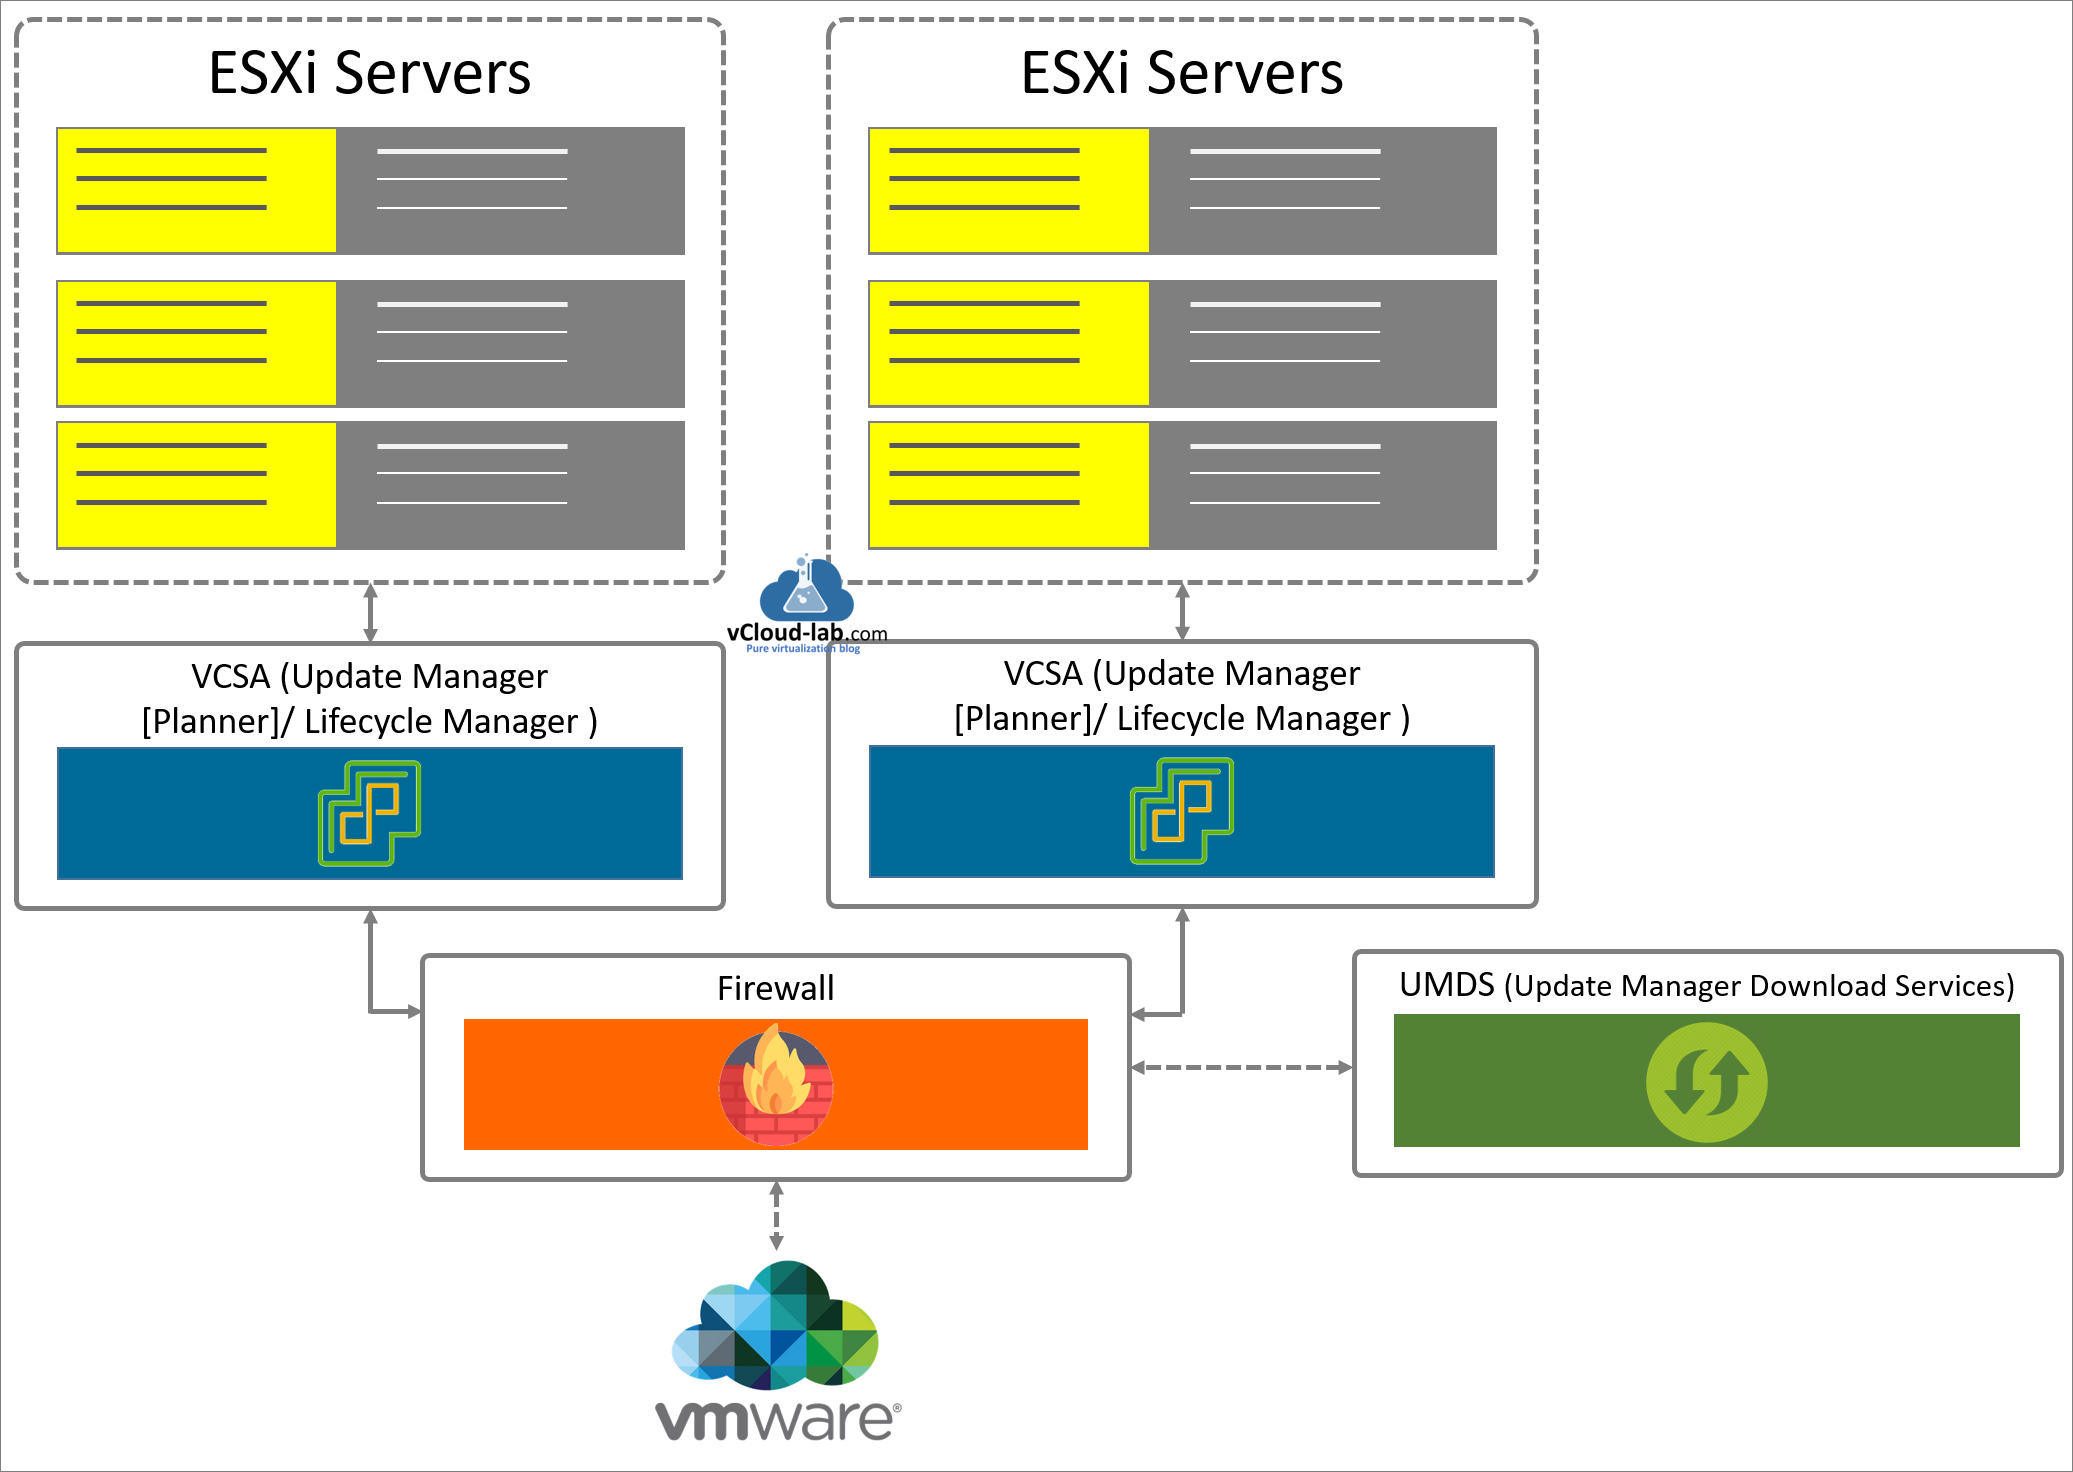
Because of centralization characteristic of using UMDS server, You download updates once only, so you use less bandwidth another benefit you can manage/restrict the versions centrally. Setup files for UMDS tar is available on vCenter (vcsa) ISO file, just to note from vSphere 7 version onward there is no Windows version UMDS available to deploy. It is only available for Linux. I copied VMware-UMDS-X.X.X-XXXXXXX.tar.gz file to Linux server using winscp tool. I am using CentOS 7 as linux server.
Prerequisite of UMDS server
- Linux server with below criteria
- psmisc package
- nginx web server
- Internet Connection
- VCSA ISO file
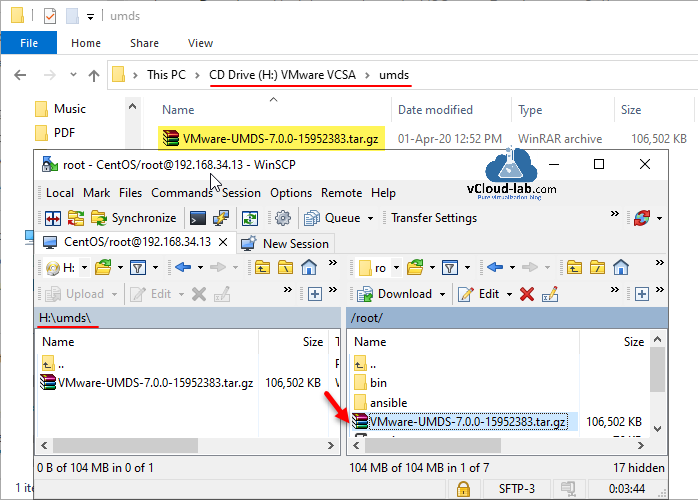
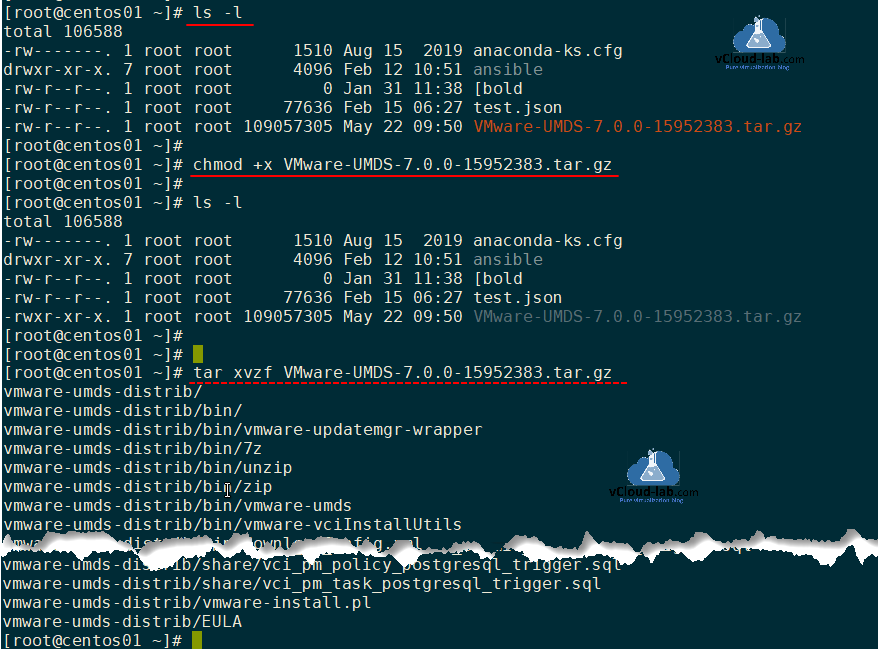
I have uploaded the tar file to /root folder, and changed the file execution level, next untarred the file with below commands.
chmod +x VMware-UMDS-X.X.X-XXXXXXX.tar.gz
tar xvzf VMware-UMDS-X.X.X-XXXXXXX.tar.gz
Once untarred the tar.gz file, go the directory and execute ./vmware-install.pl, This shows the message of Setup is unable to find the "killall" program on your machine. Please make sure it is installed. Do you want to specify the location of this program by hand? I will type no as I didn't installed the prerequisite psmisc package next.
cd vmware-umds-distrib
./vmware-install.pl -d
     This shows the message of Setup is unable to find the "killall" program on your machine. Please make sure it is installed. Do you want to specify the location of this program by hand?

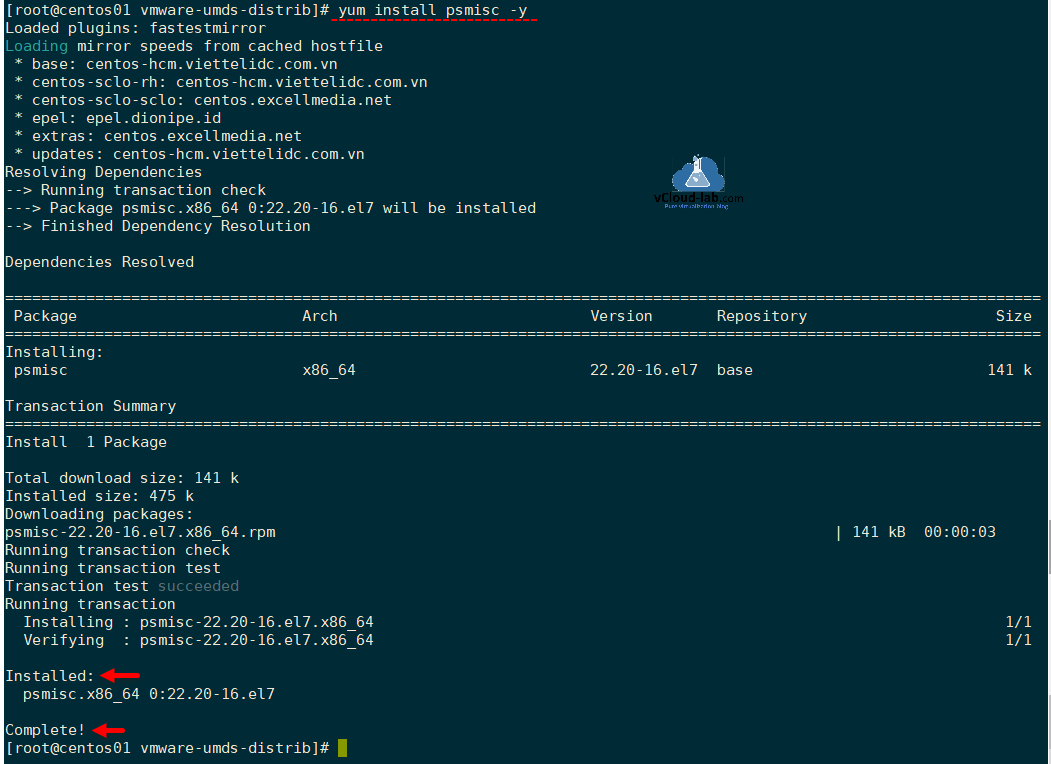
Package psmisc is available on online yum repo to install.
sudo yum install psmisc -y
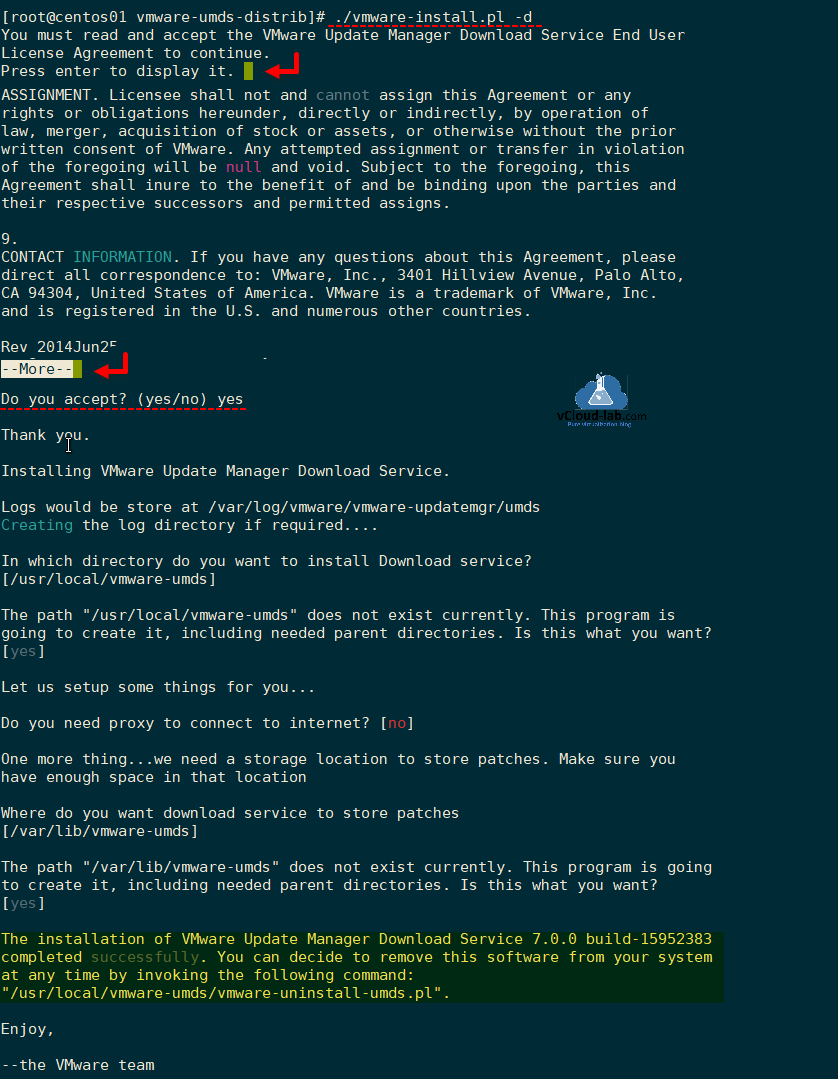
Next try installing UMDS again with ./vmware-install.pl -d, here d parameter represent default option. Check license and Agreement by pressing enter, keep pressing Enter until more option from left bottom is disappeared. next it shows Do you accept? EULA, type yes, It start installation with default options, I can change the settings later. You will see installation successfully done with vmware-uninstall-umds.pl script path.
./vmware-install.pl -d
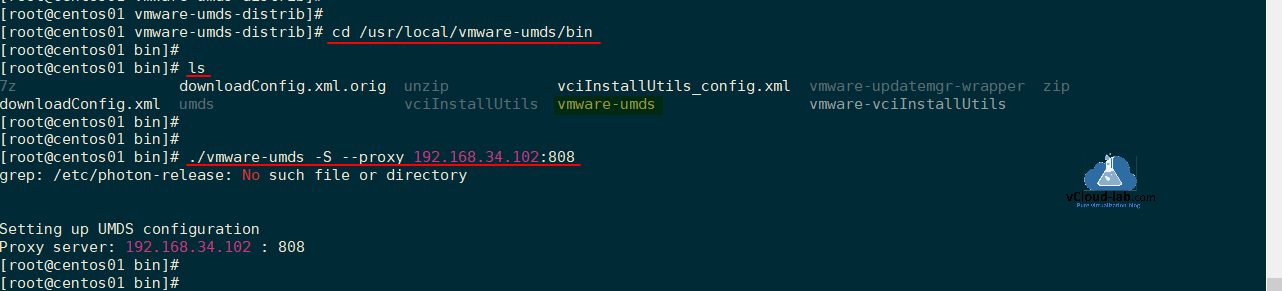
I am using proxy server for UMDS server for internet access, To use proxy server, change directory to /usr/local/vmware-umds/bin and execute below commands.
cd /usr/local/vmware-umds/bin
./vmware-umds -S --proxy FQDN_IP:PORT
If you are facing issue with ssl as below, I have already resolved it in below article.
VMware UMDS curl_easy_perform() failed: cURL Error: SSL peer certificate or SSH remote key was not OK, SSL certificate problem: unable to get local issuer certificate.
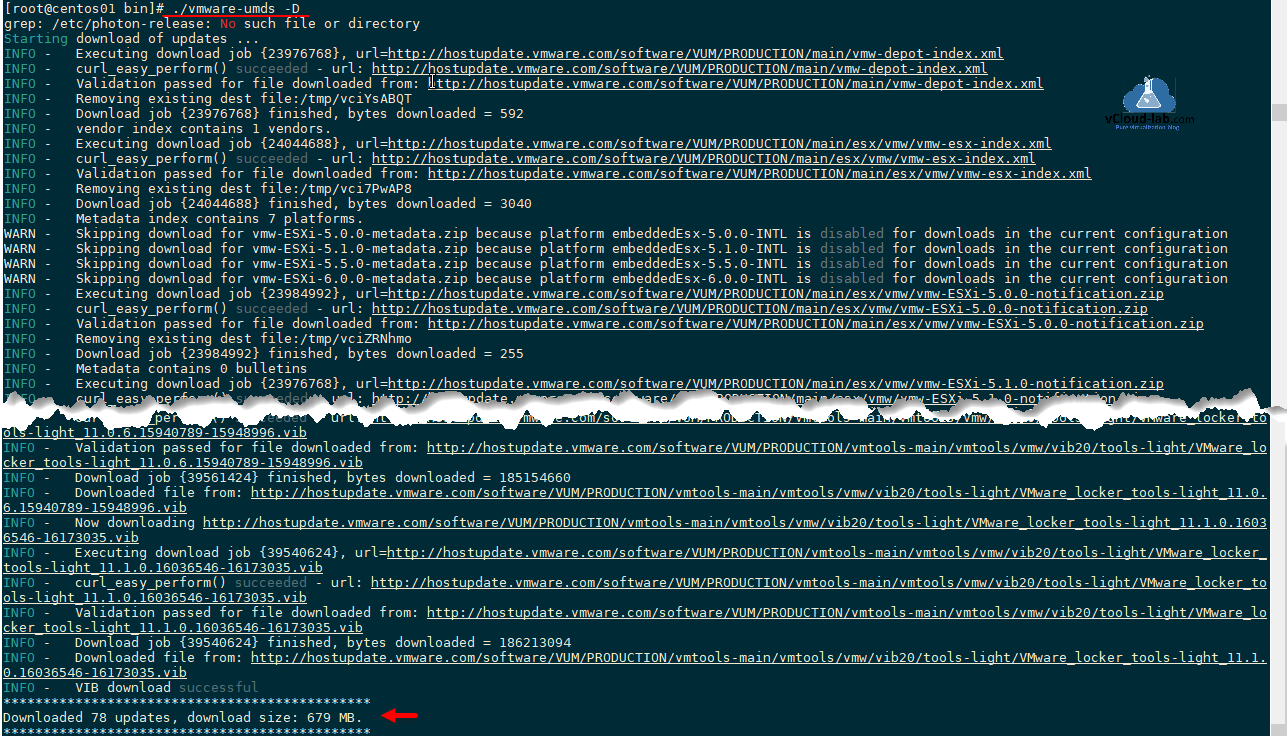
Start downloading updates. I will show how many patches and size of the download.
./vmware-umds -D
Additionally you can use below commands to configure UMDS via command line.
/usr/local/vmware-umds/bin/vmware-umds -G  #Shows current UMDS configuration

#disable download of earlier versions of patches
/usr/local/vmware-umds/bin/vmware-umds -S -d embeddedEsx-6.0.0 embeddedEsx-6.5.0

#add additional online repositories
/usr/local/vmware-umds/bin/vmware-umds -S --add-url http://vmwaredepot.dell.com/index.xml --url-type HOST
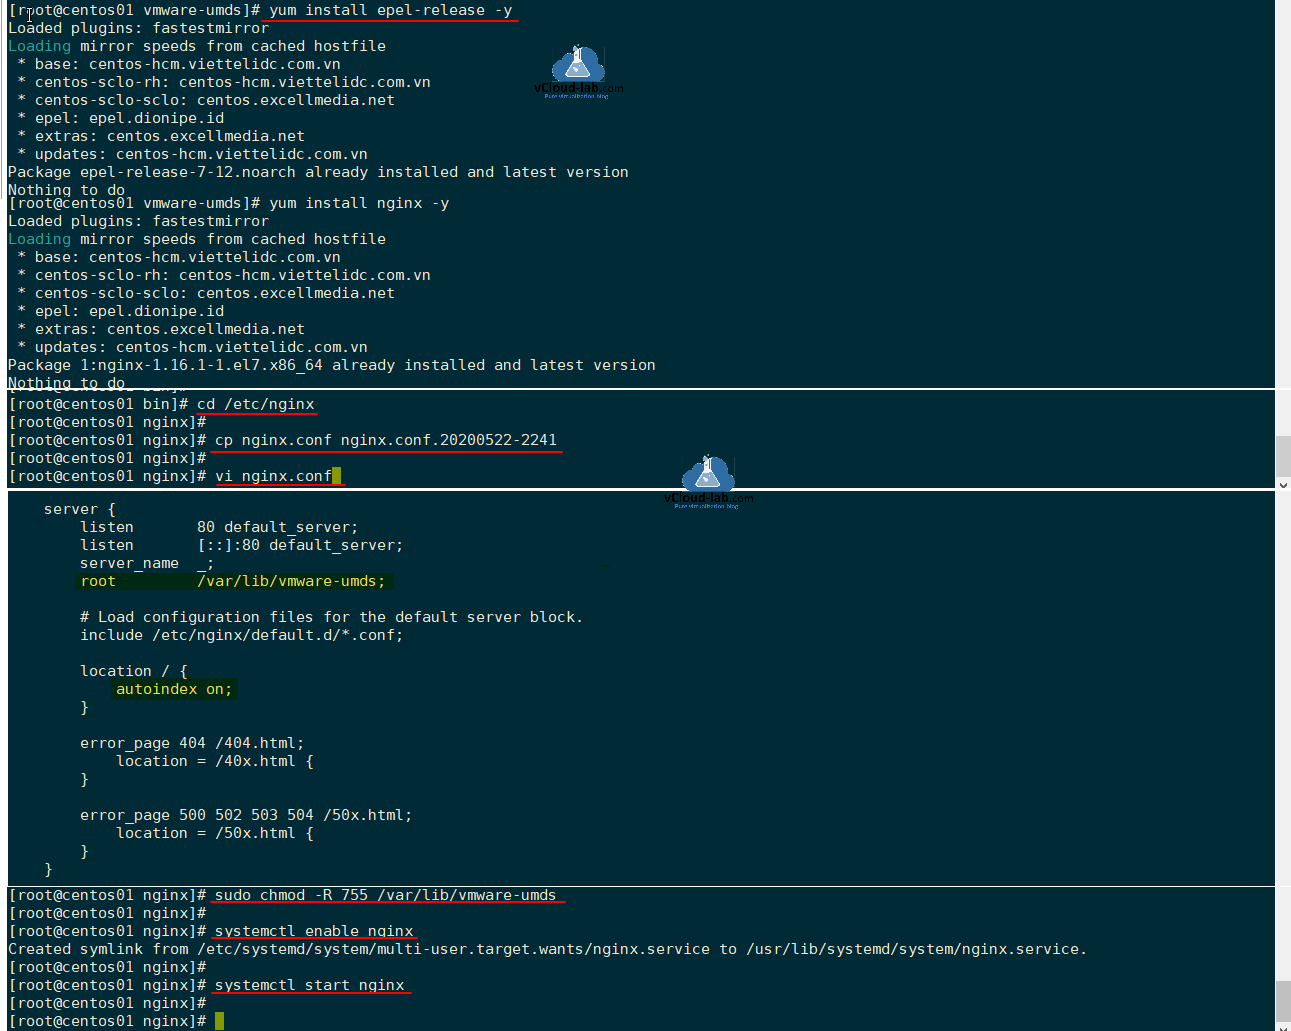
Once UMDS downloads patches, we will publish them over local web server, for web server I am using Nginx (I have already installed latest version)
yum install epel-release -y
yum install nginx -y
To configure nginx make below changes, in the /etc/nginx/nginx.conf, before making changes make sure you backup the Nginx configuration file.
cd /etc/nginx
cp /etc/nginx/nginx.conf /etc/nginx/nginx.conf.bak #backup before making changes
Make changes to root option under Server node, /var/lib/vmware-umds is a location where UMDS downloads patches and metadata. Another thing the files need to be in directory mode, so I have added autoindex on under location node.
#Edit nginx configuration file.
vi nginx.conf
     server {
            root /var/lib/vmware-umds;
     }
     location / {
            autoindex on;
     }
Next change the permission of the UMDS patch location and enable / start Nginx web server services.
#change permission on umds donwload location
sudo chmod -R 755 /var/lib/vmware-umds

#enable and start nginx service
systemctl enable nginx
systemctl start nginx
Verify UMDS url location http://umds_fqdn_ip/hostupdate/ in the browser, It must be functional, you can add SSL certificate on nginx server for https 443 port, But for this lab demo I am ok with http 80 port.

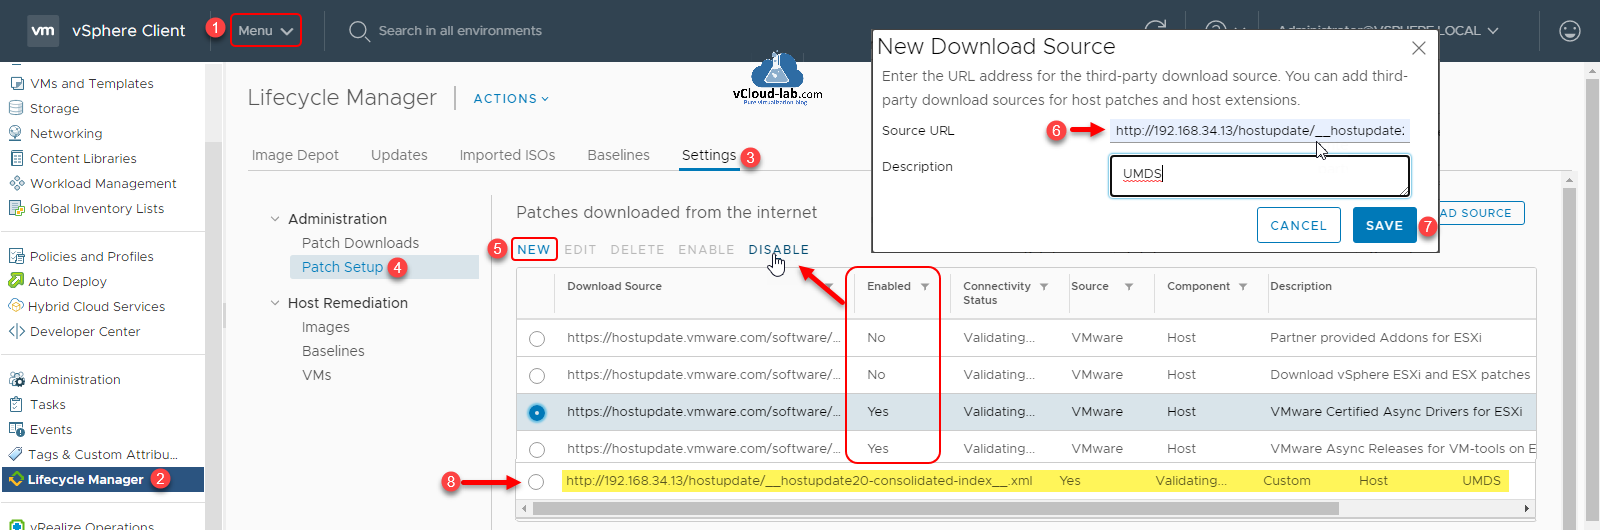
UMDS server is ready, we will need to configure it on VUM (VMware Update Manager/Lifecycle Manager), Login to vCenter vSphere HTML65 client, go to Menu >> Lifecycle Manager >> Settings >> Patch Setup (Administration). (You can make disable other online vmware hostupdate sources)
To add UMDS url, Click New Download Source, and type URL with meaningful optional Description and save.
Url will be http://umds_fqdn_ip/hostupdate/__hostupdate20-consolidated-index__.xml
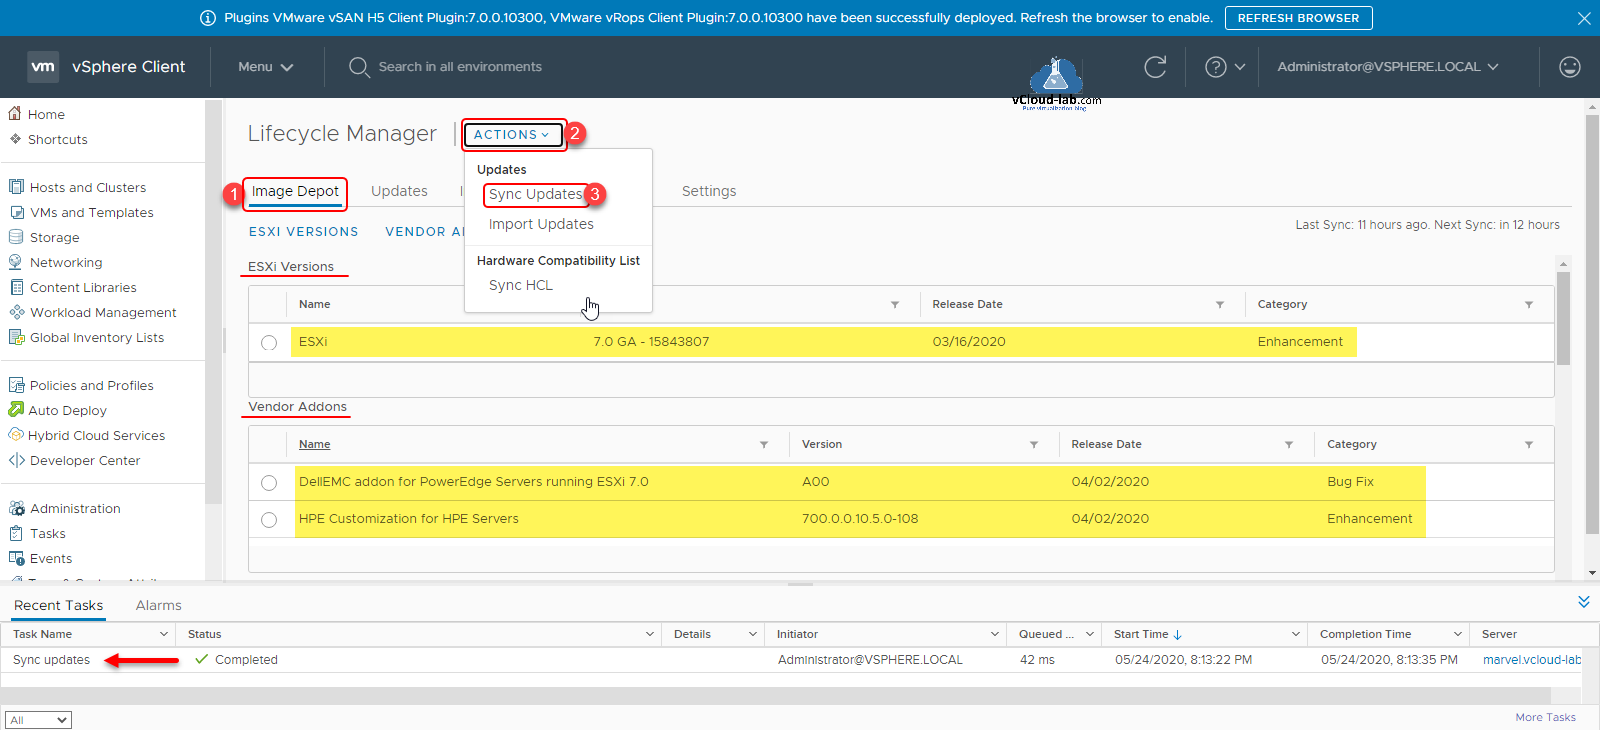
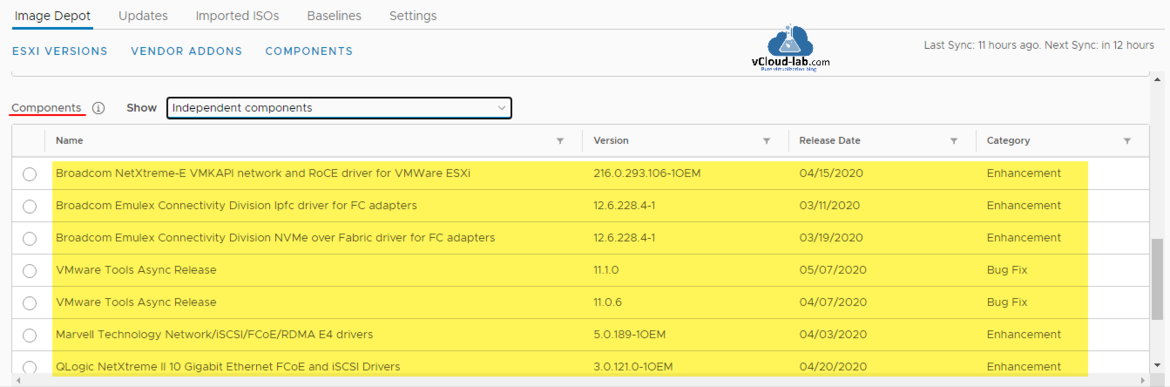
Next on the Lifecycle Manager go to Image Depot, click ACTIONS and under updates click Sync Updates, It will start downloading updates and it cant be viewed under ESXi Versions, Vendor Addons and Component tab. Next you can create baseline and start upgrading servers, I will write a separate Articles for the same next.
Useful articles
VMWARE VCENTER 6.5 UPGRADATION ERROR
THERE WAS ERROR CONNECTING VMWARE VSPHERE UPDATE MANAGER [VCENTER:443] DATABASE TEMPORARILY UNAVAILABLE OR HAS NETWORK PROBLEMS
WINDOWS VCENTER 6.5: VCENTER VPXD AND OTHER SERVICES MISSING OR NOT EXIST IN SERVICES.MSC
RESOLVED : ADDING VIRTUAL HARD DISK GRAYED OUT ON VIRTUAL MACHINE
VMware hot-extend was invoked with size is not supported: Virtual Machine HDD VMDK
http://kunaludapi.blogspot.com/2012/08/installing-and-configuring-umds-update.html
